Flowers & Bugs Lesson Plan
Great for 3rd Grade and up
Lesson Learning Targets
I am learning about
● Radial balance
● Primary, secondary and analogous colors
● Wet on wet painting technique
Process
Day One:
LEARNING TARGET:
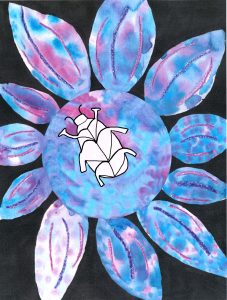
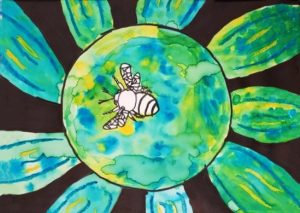
I am learning about radial balance so I can connect to math (radius of a circle) and understand the art principle of balance. I know I got it when I can create a circle with flower petals expanding out from the center.
Discuss radial balance as symmetry that expands out from the center. Find examples in the space you are in and think of other examples (snowflake, some flowers, sun, clock, bicycle wheel, pizza, an orange cut in half…).
Demonstrate how to trace a circle on paper with pencil. Draw each petal expanding out from the circle.
TIP: It’s easiest to draw a petal, turn the paper, draw a petal, turn the paper, that way each petal is the same and your hand doesn’t do anything different because you are turning your paper, not your hand. Remember to let petals crop off page instead of squishing them to fit so it looks like a picture zoomed into a flower.
Let students work and give the rest of instructions when ready.
Demonstrate how to draw a realistic bug.
TIP: Pay attention to the type of line and type of shape. Pay attention to the direction those lines and shapes go, how big they are compared to each other and where they are in relation to each other.
Day Two: (many may need to finish drawing bug)
LEARNING TARGET:
I am learning about primary, secondary and analogous color schemes so I can
understand the art element of color, the color wheel and color mixing. I know I got it when I can create with 2 primary colors and the 1 secondary color they mix to make.
Discuss the color wheel! Talk about primary colors and how they mix into secondary colors. You can go farther and discuss how colors next to each other on the color wheel are analogous color schemes. Artists should pick 2 primary colors and the 1 secondary color those primary colors make (ie yellow and blue to make green). The set of 3 colors are analogous (yellow, green and blue).
Days Three – Four:
LEARNING TARGET:
I am learning about about wet on wet painting technique so I can try a new way to paint, connect to tie dye and to science with color mixing. I know I got it when I can paint my paper with clean water and let my paint flow and mix just on the petals and center of the flower.
Ask artists if they’ve ever done a tie dye project. If so, did they get the fabric wet first to help the dye flow/penetrate the fabric? What colors did they use? Did the colors mix?
Demonstrate how to get your paint brush wet with clean water and paint one petal with water, not too sloppy, just right. Using watercolors, either dip your brush into liquid paint or load a lot of cake paint and dot it onto your wet petal and watch the paint spread out! Also watch the crayon resist or push the paint away. Use both primary colors. Help them mix if needed by gently pushing the colors around with the brush but be careful not to overmix. Try to keep each primary color visible but also show the secondary color they made (you can also use paint of the secondary color, too, but stick to the analogous scheme already chosen).
TIP: Start with the petals to get a handle on this technique. Too much water and the paint gets watered down and flows too much; not enough water and the paint doesn’t flow/mix. Have a paper towel ready to help gently blot the paper or to tap the brush on to control water/paint flow. Paint all the petals before the center. The center is the hardest so keep the paint flowing and use the tip of the brush to get the flower wet around the bug but not the bug. REMEMBER the paint will go wherever the water goes.
Days Five:
Special thanks to Rebecca Leonardy, Art Educator @ Colorado for this lesson plan!
Age Group
3rd grade +
Time
5- 45 minute classes
Materials
● Plastic lids/circle stencils
● Pencils
● OW paper
● Variety of Step by step/How to draw images of realistic bugs
● Watercolors (liquid work best but cake are great)
● Good watercolor brushes (size 12 with a fine tip or smaller sizes to get into small
spaces)
● Water cup
● Paper towels
● New fine tip permanent markers (for outlining bug)
● Chisel tip permanent markers (for coloring in outside flower)
● Paper placemat to keep permanent marker off table