Catching Snowflakes- Storm Selfie Lesson Plan
🎯 Objective:
Students will create a self-portrait from a unique, looking-up perspective—imagining themselves in a snowstorm, catching snowflakes on their tongue. This lesson emphasizes:
- Expressive self-portraits
- Creative perspective
- Use of pattern and color
- Wax resist technique
Process
- Sketch the Face
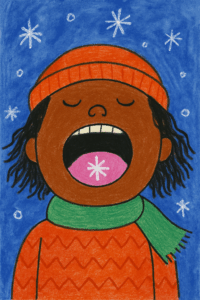
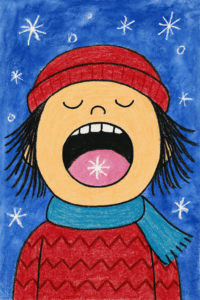
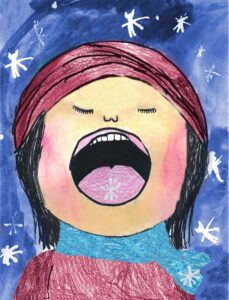
- Near the top of the page, draw a large circle for the face.
- Add a small oval “button nose” at the top of the circle—this shows they’re looking up.
- Draw a huge open mouth under the nose using a sideways capital “D.”
- Inside the mouth, draw a tongue and add rows of teeth (don’t forget to leave blank spaces for any missing teeth!).
- Add Details
- Draw a winter hat (optional: add stripes or a pom-pom).
- Sketch the scarf as a soft rectangle under the head.
- From the scarf, add two curved lines downward to suggest shoulders/body.
- Decorate the scarf and shirt with patterns (zig-zags, dots, etc.).
- For hair, have students consider it’s a windy snowstorm—let that hair go wild in all directions!
- Color It In
- Use crayons or markers for everything except the background.
- Encourage bold colors and completely filled-in shapes—no white gaps!
- Snowflake Resist Background
- Use a white crayon to draw snowflakes in the sky (stars, x-shapes, dots—get creative!).
- Then, paint over the entire background with blue watercolor.
- The white crayon will resist the paint and make the snowflakes pop!
- Go over the pencil lines with a black crayon.
- Press down firmly.
- Make sure to erase or cover all pencil lines.
- Snowflakes on the Tongue
- Add one or two snowflakes inside the mouth using white crayon or marker. That’s the fun part!
- Final Touches!
- Add any final touches to make their self portraits unique to who they are.
💡 Tips & Tricks:
- Demonstrate the “resist” trick first—it feels like magic when the snowflakes appear!
- Remind students this is a self-portrait—their scarf, hat, hair, and smile should reflect them.
- Use a sample (like the one you shared!) to help them visualize the perspective.
Age Group
Grades 1-3
Difficulty
Moderate
Rated 3 out of 5
Time
1-3 Class Sessions
🖍️ Materials
- 8 ½” x 11″ white art paper
- watercolor paints
- brushes
- water
- crayons (especially white!)
- markers
- paper towels or scrap paper (for blotting)
- example of the project