Rainbow Fish
Process
WORK TABLE SETUP
On tables when children arrive:
- One prepared paper per child (with pencil border drawn)
- Permanent markers (ideally one per child, placed above paper)
- Water cups
Nearby (NOT on tables yet):
- Blue paint on small paper plates
- Multiple paint colors (about 5) on separate plates than the blue
- Paint brushes
OPENING DIALOGUE & STORY
Ask:
- How many of you have a pet?
- Do any of you have a fish?
- Have you seen a fish before? (pet store, aquarium, snorkeling?)
Tell:
Today we’re going to draw and paint a fish — but not just any fish! This one has a magical story that starts at… the ice cream stand.
Story with Drawing Steps on the Easel:
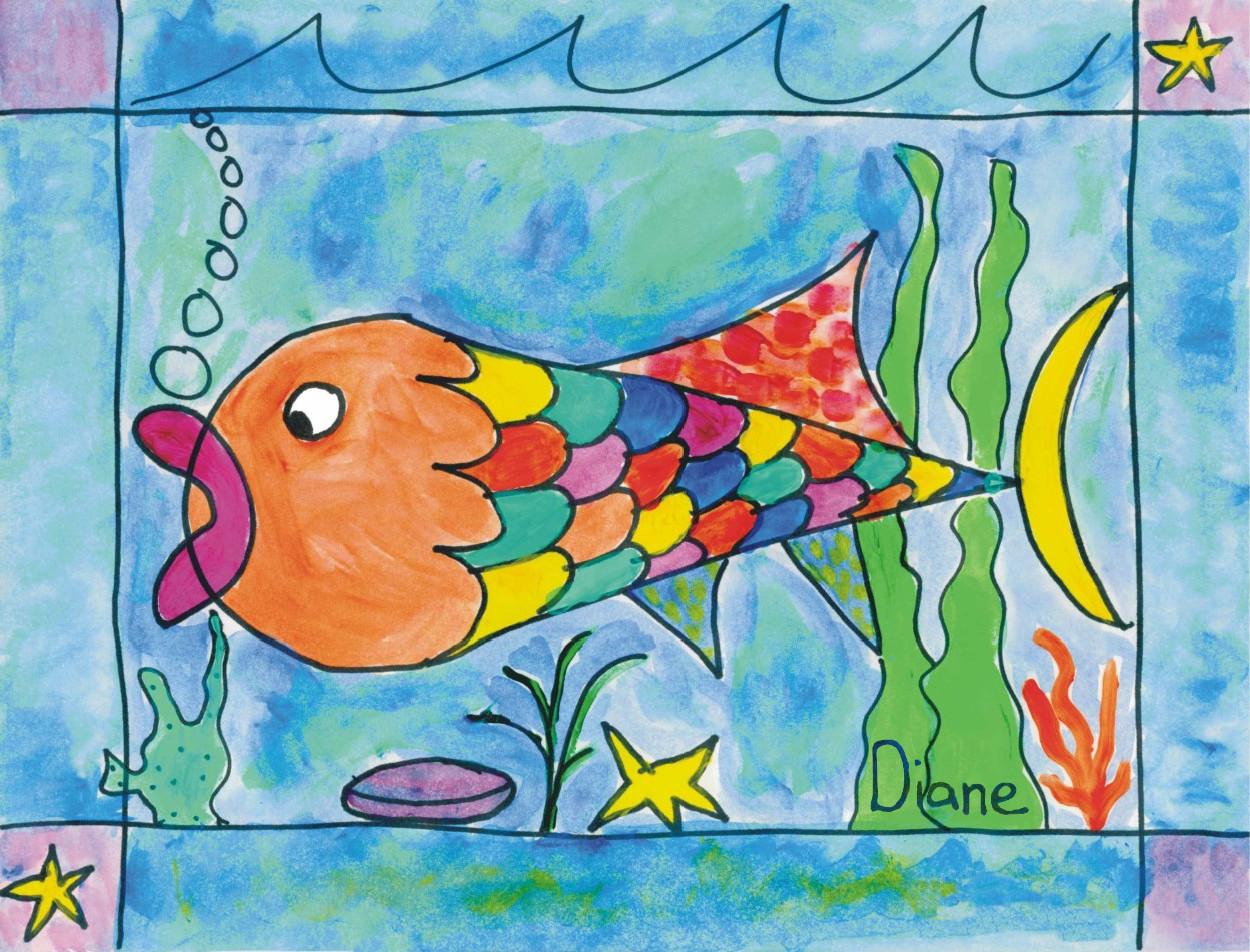
STEP 1/STORY: “One very hot summer day a young boy took out money from his pocket and handed it to the ice cream vendor. He asked for a scoop of his favorite vanilla ice cream on a cone.”
→ Start with your paper vertically. Draw a cone (triangle) + scoop (circle).
STEP 2/STORY: “That seemed like a pretty ordinary request until he asked for a big pickle to go on top. That’s right a pickle, not a cherry, but a big juicy pickle.”
→ Draw pickle shape on the scoop.
STEP 3/STORY: “The man handed it over to the boy. The young boy was just about to take a bite when the cone slipped out of his hand and the whole thing landed on its SIDE down on the ground.”
→ Turn paper sideways (horizontal)
STORY CONTINUES: “The nice ice cream vendor saw what happened and made another ice cream cone for the boy. The little boy thanked the man and off he went.
BUT HE NEVER BOTHERED TO PICK UP THE CONE THAT FELL OVER ON THE GROUND! In fact no one bothered to pick up the cone. Now you would think that on a hot sunny day in the summer the ice cream would melt but no, it did not! This was destined to be a very special, almost magical ice cream cone. Listen to what happened…”
STEP 4/STORY: “It was now night time and the moon came out. The moon looked down and saw the poor little ice cream all alone on the ground. It decided to visit the cone and came down attaching itself right to the tip of the cone.”
→ Draw “C” shape at cone tip.
STEP 5/STORY: “The ice cream cone was quite bewildered. It shook a little and had a very strange feeling go through its body. I feel very different thought the ice cream cone. If only I had an eye…. And its wish came true.”
→ Draw a small circle.
STEP 6/STORY: “If only I had some beautiful scales…. And then this wish came true too.”
→ Draw half circles all over the cone.
STORY FINISHES: “The ice cream cone is transformed into a… FISH! (let children shout it out) At that moment someone came by and scooped up the little fish and took it home to its aquarium.”
DRAWING STEPS WITH THE CLASS
Step 1 – The Aquarium Border
- Paper vertical (up and down)
- Trace over pencil border with black marker (vertical lines first, then horizontal)
Step 2 – Ice Cream Cone
- Draw a triangle (cone)
PROMPT: “The first thing the little boy ordered was the ice cream cone.” - Add a circle (scoop)
PROMPT: “Now we are ready for the scoop of ice cream on top” - Add a pickle on top
PROMPT: “What did the little boy want on top of his ice cream?”
Step 3 – Magic Transformation
- Turn paper sideways
PROMPT: “What happened next? It fell over” - Add moon to tip (C shape)
- Add eye
- Add scales (half circles)
- Add top and bottom fins
Optional Details: seaweed, bubbles, baby fish, border patterns. Anything they want to add to their aquarium
PAINTING
- Explain brush rinsing (swish in water while counting to 10).
- Paint blue water first (all around the fish).
→ Trade markers for brushes and blue paint plates. - Once blue water is complete, trade for plate with many colors.
→ Paint scales (use yellow first if possible).
WRAP-UP
- Hang paintings to dry.
- Read The Rainbow Fish or other fish stories.
- Snack idea: Pepperidge Farm Goldfish crackers.
- When dry, have each child sign and date their artwork in permanent marker. Keep inside the border, away from the edge.
Age Group
Grades – Best with younger students
Time Needed
1–2 sessions (45–50 minutes each)
🖍️ Materials
- Paper: White 8.5″ x 11″ art paper (draw a very light 1″ pencil border around the edge beforehand)
- Pencil
- Black medium-tip permanent markers
- Paint:
- Blue (2–3 shades for more interest)
- 5 additional colors for fish scales (include yellow; encourage using yellow first)
- Water cups
- Brushes: small head for painting 8–12 small scales
- Easel or blackboard (optional, but helpful for demonstration)