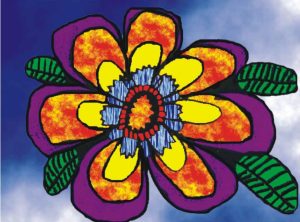
Flower Close-Up Lesson Plan
A marker drawing with a watercolor wash background
Process
Day 1
Discuss different kinds of flowers.
- Show pictures and actual examples.
- Talk about color contrast and relationships, shapes of petals, textures within the leaves and other aspects of flowers.
Locate and mark lightly, with pencil, the middle of your heavy white paper.
Outline the center of your flower. This may be done in pencil but must be covered over with black marker prior to adding color.
Now make 4 rows of petals.
- Plan the space so that the last row is near the paper edge, but not too close.
- Vary the shape and size of the petals.
Add the leaves.
- Start with outline
- Add veins
- Color them green
- Students can experiment with various shades of green
Day 2:
Color the flower.
- Using markers, fill in the petals.
- Each row should be a different bright, bold color.
Select a contrasting watercolor paint for the background.
- Using a brush and water, fill the background with a watercolor wash.
Add finishing touches. Each student should put his/her name on the front, in a contrasting color, away from the paper edge. Make sure to record the student name, grade/teacher and school, in pencil, on the back of the artwork.
Age Group
Grades K-2
Difficulty
Moderate
Rated 3 out of 5
Time
2 Class Sessions
Materials
- 8 1/2″ x 11″ white art paper
- fine tip black markers
- colored markers
- watercolor paints & brushes
- books and pictures of flowers
- example of the project