Looking into my Life Lesson Plan
Process
Getting started
- Students/teacher need to determine which version of the collage they will make. Favorite or Painted.
Taking student pictures
Take a digital photograph of each students.
- The student should be standing in front of a light colored wall.
- The photo needs to be just the back of their head and shoulders.
- Be sure to keep the size of your paper in mind when taking the photograph.
- The photographs can be printed on a standard black and white printer and will not be needed until closer to the end of the project.
- Depending on what version of the project you have decided on, have the child hold either a pencil (collage of favorites) or a paint brush (painted masterpiece) as if they were drawing/painting on the wall.
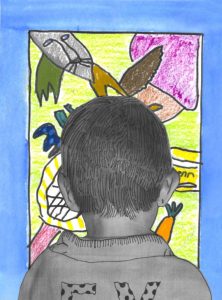
Favorites Collage
- Have each child make a list of “favorites” on a piece of scratch paper.
- Topics might include favorite number, season, food, color, animal, sport, saying or thing to draw.
- Please be aware that copyrighted or trademarked symbols/characters cannot be reproduced.
- In a column next to each favorite item have the children develop an artistic symbol to represent their ideas.
- Speak about composition and collage.
- Explain that they will need to use a ruler to draw the pane of a window around the border of their sheet of paper.
- Ensure that the borders are at least 1” wide.
- Inside the window pane they will be arranging their items in a collage fashion.
- Draw items using pencil and remind students to keep important drawings away from the lower center of their frame.
- Use the following techniques when arranging the items; overlapping, being partially “covered” by the frame, repetition, angling and size variation.
- When the collage is complete, children will color their picture using the medium of their choice.
- Remind them to color the frame and the background.
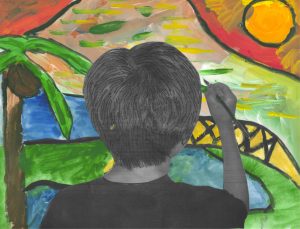
Painted Masterpiece
- Have each child make a list of places that they would like to visit and why.
- Discuss their lists and reasons.
- What are some of the reasons someone might paint a particular scene?
- Was the artist really there or was it from their imagination?
- Children should pick the place from their list that they wish to paint.
- Speak about composition and perspective.
- Explain the concept of “dividing” your masterpiece into three areas – the background, the middle ground and the foreground.
- Sketch, in pencil, on the heavy white paper.
- The artist should fill in the entire sheet of paper with their sketch.
- Remind students to keep important parts of their drawings away from the lower center of their page.
- Speak with the students about adding an “object of interest” to their sketches…a large palm tree or a waterfall would be great for a tropical scene or a cactus in a desert scene.
- Once the sketches have been approved the artist should fill in their page with color utilizing either watercolor or tempera paints.
- Stress the use of bright bold colors.
- Let dry completely.
Add Student Photos
- Distribute the painted photos of the back of each child’s head. Instruct them how to use a fine tip marker to trace the strands of their hair.
- Discuss how to find where strands begin and end.
- Students should not outline their heads.
- Students should also outline and accentuate lines on their shirts.
- Optionally, students may design the back of their shirts to represent something about themselves.
- Discuss the shirt design will “fall off” the page.
- You may also do a watercolor wash on the hair at this time – if you choose to do so, you will need to use permanent marker for the lines of the hair.
- Finally, children will cut out their photo of the back of their head and glue to the bottom edge of the paper.
- The photo will more than likely cover up a portion of their artwork – this will help to create a feeling of depth.
- If students have not incorporated their name within their collage, they should do so now.
Special thanks to Jayme Martin, Art Educator @ Superior, CO for sharing this lesson plan.
Age Group
Grades 4-8
Difficulty
Difficult
Rated 4.5 out of 5
Materials
- 8 1/2″ x 11″ white art paper
- digital camera
- computer
- black & white printer
- heavy white paper
- colored felt tip markers
- black thin tip markers
- glue
- coloring supplies (colored pencils, markers, crayons, etc.)
- rulers
- scissors
- watercolor paint (optional)
- tempera paint (optional)