Tooth Fairy Lesson Plan
Purpose
To create a satisfying piece of art that has meaning for most children. This lesson develops fine motor skills, acquaints them with shapes and colors and exposes them to cultural folklore. Read children’s book on dental hygiene. You could also arrange for a dentist to visit the class.
Procedure
1) Give each child a piece of heavy white paper. (Teacher – print, in pencil the name of each child on the back of the paper to prevent any possible mix-ups)
2) Have all the children tear up bits and pieces of bleeding tissue paper and put it into a big pile. Three or four different colors work the best.
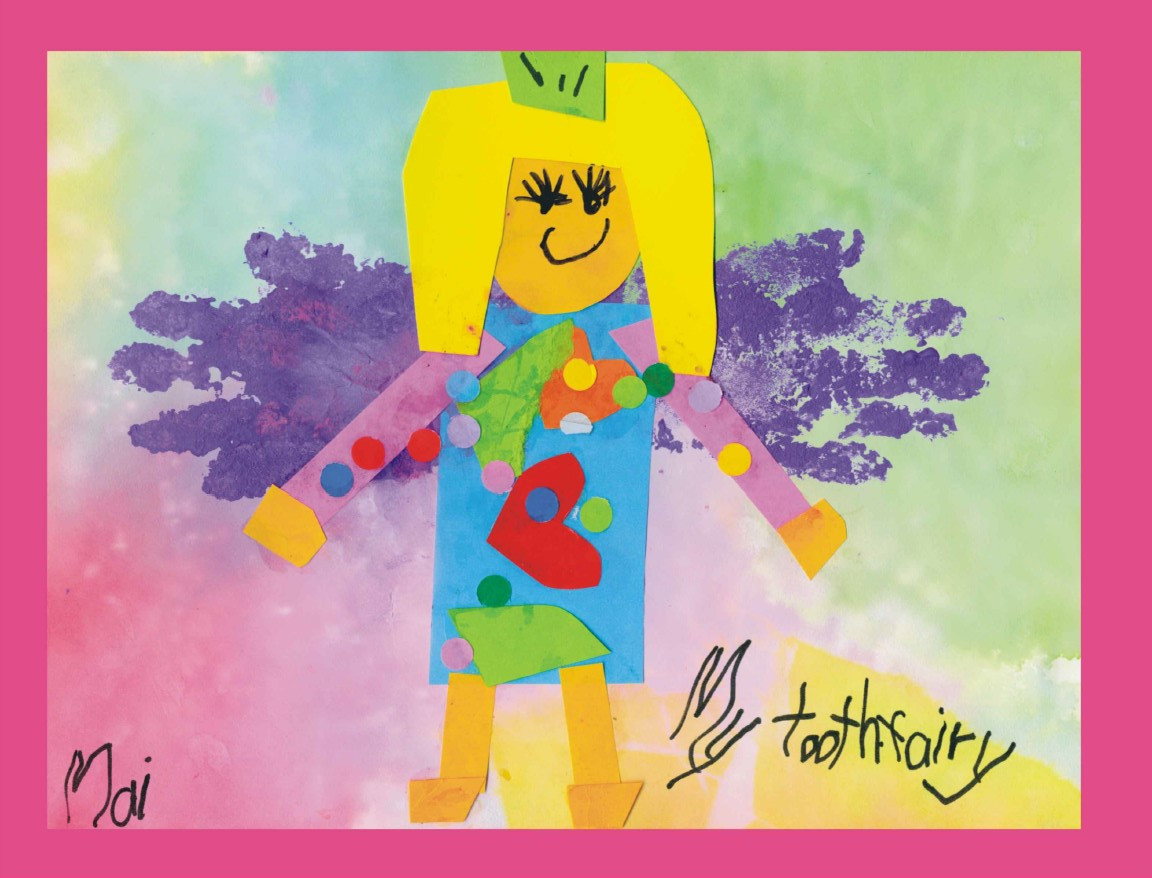
3) Wet the heavy white paper. (Technique ~ wringing out a sponge in the middle of the paper and wiping the “puddle” across the page works well and is quite controllable) While the paper is still wet, select a number of differently colored pieces of bleeding tissue paper and press it with your fingers onto the wet paper. NO GLUE, just let the damp paper hold the tissue in place. Allow the paper to dry completely.
(While you already have the tissue paper and water out on the table, you may want to do another class project. Start a very large stained glass “window” to hang in the classroom. Later on, you can add black construction paper strips to resemble the lead and do a whole unit on it)
4) After the paper is dry, the children can “slough off” the tissue paper and discard the bits. What should be left on the paper is a lovely multicolored background.
5) Have pre-cut strips of colored paper ready so the children can select and glue along the outside of the paper. Remind students to stay inside the heavy white paper. This will create a finished border. Pieces that are too long or overhang may be trimmed later.
6) Paint the hand print “wings”. Teachers may choose a couple of colors to paint – pour each color into a separate dish. It is nice to give children a choice, but they should pick ONE color and use the SAME color for both hands. This will unify the “wing” and make them look more realistic. Once children have pressed their painted hands onto the paper, put the paper aside and allow it to dry completely.
7) Have paper pre-cut into different shapes: Short rectangles (legs), longer rectangles (arms), circles or ovals (head) and larger 2” x 3 ½’ rectangles (body). Have the children find the correct pieces for their body parts and place on the paper. After the placement has been approved, have the children glue their parts into place.
8) Now they can individualize their artwork. Small pieces of paper, cut tor torn, can be used for hands, feet, hair, and a crown. Heart shapes may be added to the torso for decoration. Children can also glue on colored paper circles made from a hole punch.
9) The final step is completed with a fine tip black marker and is best done on a one-on-one basis. Have each child draw a face (don’t forget eyelashes), sign their name as best they can; and if they are able, have them copy the words “My Tooth Fairy”. (HINT – Make sure you have the words printed on a paper right in front of them in about the same size you expect them to print.) Parents always love to see things printed in their own child’s hand.
Age Group
For younger children. K-2
Difficulty
if done in steps over a few days and prep work is completed. The end result is worth it!
Time
2-3 Sessions
Materials
- 8.5″ x 11″ white art paper
- paint
- colored paper
- hole punch
- water
- scissors
- black fine tip markers
- glue
- *bleeding tissue paper
- examples of project
*IMPORTANT – It is important to use the bleeding type of tissue paper, sometimes referred to as “stained glass” tissue, to achieve the desired background. You can find this type of tissue in any art store – a little goes a long way.