Across the globe, art classes are beginning their Original Works projects. The student masterpieces will be turned into cherished keepsakes, and will become holiday gifts for many. Each year we are privileged to process several hundred thousand pieces of individual student artwork. With this volume of artwork being created and submitted, we thought this would be a great time to share some tips on creating the perfect artwork.
Each year we review and update our art guidelines. This enables us to specify for our customers the best media to use in creating the artwork, while also identifying media that should be avoided either because it will not reproduce well or could damage our equipment.
I’ll start with everyone’s favorite- Glitter. It is so pretty and sparkly when added to a picture. But, when scanned into a computer it is not so pretty or sparkly. Actually, it typically reproduces as black specks. Glitter also causes many problems when it gets into our equipment.
A good rule of thumb for other abrasives and materials, is that if you rub your hand over the finished artwork and anything comes off, we will not be able to process it.
One of our more popular projects is using hand or footprints to create the artwork. While we love this idea, and have several lesson plans featuring this concept, we have a few suggestions on how to make the most of it.
- Use the entire sheet of 8.5” x11” paper and include a nice background and/or border.
- Placing a single small handprint in the center of the white paper can often give the appearance that the hand is floating on the project.
- Also, when the image is acquired, the entire 8.5” x 11” area is sized to the specification of each product and can not be cropped or adjusted. As a result, you could end up with a finished product like that shown on the left:


Many of our products are printed using a full bleed, which means that the image is printed from edge to edge. This is why we stress the importance of keeping the important details 1” from the edge. Below is an example of some pieces or art, and how they would look made into one of the ceramic tiles.
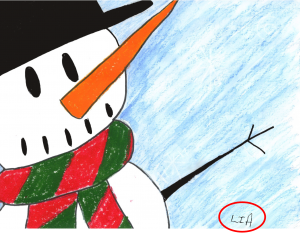
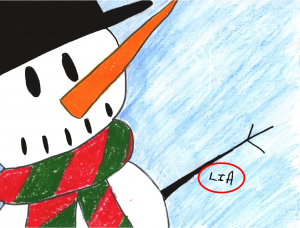
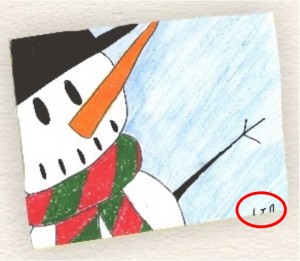

Adding borders to your art creates a nice finished look. This can also be a good way to reinforce keeping important details away from the edge of the artwork.


Bold bright colors reproduce best.

Using pencil or lightly drawn images will often be hard to see.


So remember:
- Use the entire page and include backgrounds and borders in your artwork.
- Use bright/bold colors. Avoid pencils or lightly drawn images.
- Place important information like names or dates at least 1” from the edge of the paper.
If you are not sure if something will be accepted, please don’t hesitate to call our Customer Service team at 800.421.0020, and they will be glad to assist you.
Now go out and have fun creating! We can’t wait to see the finished pieces used in your next fundraiser!