Balloons & Kites Lesson Plan
Process
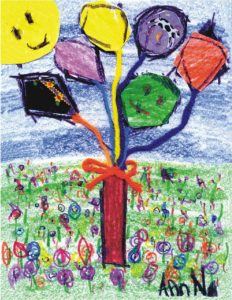
1. Fold the white paper gently in half and open the crease line. The top half will be your sky and the bottom half will be a field of grass with wild flowers.
2. TOP HALF: Color with a blue crayon. Alternate between hard and light pressure to create bands of varying color.
3. BOTTOM HALF: Color with a blue crayon. Alternate between hard and light pressure to create bands of varying color.
4. Choose 3 to 4 brightly colored crayons for your flowers. Make dots and circles all over the green area.
HINT!
Pretend that the grass area is a two or three layer cake.
- The top layer, closest to the sky get small dots
- The middle gets medium dots or circles
- The bottom layer gets the biggest circles
5. Once the flower “petals” are done, use a green crayon and make slash marks below your petals to resemble stems. Don’t be exact, have fun and express yourself.
6. Cut out a fence post shape from construction paper. Glue the post onto your colored background. Make sure that the bottom of your post is in the “grass”.
7. Draw or glue on additional shapes for your sun, balloons and kites.
8. Use a black crayon, yarn, ribbon or string as the “strings” for your balloons and kites. Fasten with a bow.
9. Sign your name (and year if you wish) with a black crayon. Remember to stay 1″ away from the edge of the paper.
Age Group
Grades K-2
Adaptable to All Ages
Difficulty
Time
1 Class Session
Materials
- 8 1/2″ x 11″ white art paper
- wall paper
- construction paper
- magazines
- crayons
- glue
- scissors
- yarn (optional)
- sample project