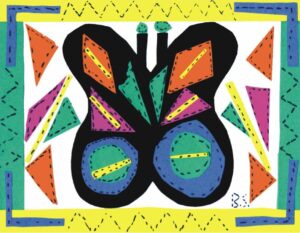
Butterfly Quilt Lesson Plan
HINT!
- Fold construction paper in half and cut out the shape of a large backwards “C”.
- Don’t cut on the fold.
- Advanced students may cut out a curved or pointed wing design.
Process
Cut colored construction paper into strips approx. ¾” wide and paste around the edges of your heavy white paper to create a frame.
Using black construction paper, cut out one large butterfly.
Open the butterfly and glue it securely to the middle of the paper.
- Allow room for antennae. Create antennae from small strips of construction paper.
- Add small circles at the top
Cut designs from construction paper to fill in the wings. The more the better.
- Use a variety of shapes and make both wings similar in design.
- Glue all of the construction paper pieces firmly in place.
Consider pasting a small shape into each of the corners. Stars, diamonds or triangles would all look great!
IMPORTANT: Adding stitch lines will turn this piece into a quilt design.
- Practice using small strokes in a row leaving a little space between each mark.
- A black fine tip marker is the perfect tool to use for the stitch lines. The more stitches the better!
To create wavy lines in your border use a fine guideline that can be covered over, erased or brushed away (white chalk works very well).
Sign your name or use your initials. Try and do so using “stitch” lines. Adding the year can also be a nice touch.
Age Group
Grades 2-4
Difficulty
Time
1 Class Session
Materials
- 8 1/2″ x 11″ white art paper
- construction paper
- glue
- scissors
- fine tip black marker
- sample project