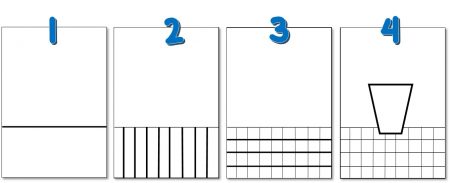
Draw a horizontal black line one third of the way up from the bottom of the heavy piece of white paper.
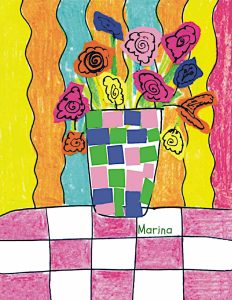
On the small bottom section, create a “checkered” tablecloth effect by drawing squares.
- Draw all the vertical strokes first
- Next, add the horizontal strokes.
Draw the outline of a vase using the fine tip black marker. Make the bottom Dip below the top line of the tablecloth. This will make the vase appear to be sitting on the table. (Don’t worry about a line showing through – it will be covered by construction paper.
Create the look of wallpaper by drawing wavy lines from the tip of your paper to the edge of the tablecloth. Be careful to work around your vase.
Using crayons, PRESSING HARD, color the tablecloth. Create an “every other” checked pattern.
Cut multi-colored squares from the construction paper. Glue onto the vase creating a mosaic appearance.
Tear larger shapes from the construction paper to glue above and around the vase. These shapes will represent your flowers.
With the fine tip black marker, add swirls and loops inside the flower shapes to create the look of petals. Add stems with the black marker.
Sign your name (and the year, if you wish) with a black marker or crayon.