

Sunset Silhouette Collage Lesson Plan

Step-by-Step Instructions
Step 1:
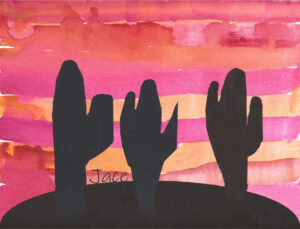
Paint the Sunset
- Paint the entire sheet of paper using warm sunset colors.
- Use colors such as:
- Yellow
- Orange
- Pink
- Purple
- Allow some colors to blend where they meet to create a glowing sunset effect.
- Let the paper dry completely.
Possible Modification: Invite students to invent their own silhouette, a plant, animal or cactus shape, instead of copying the example. Every finished piece will have its own unique personality while using the same colorful sunset background.
Step 2:
Create the Silhouette
- Fold a piece of black construction paper in half.
- Draw half of a large rounded shape along the folded edge (this will become one side of the base).
- Cut it out and unfold to reveal a symmetrical shape.
Step 3:
Add Cross Shapes (or shapes of your choice)
- Cut three long black rectangles.
- Cut six small rectangles.
- Glue one small rectangle across the end of each long rectangle to create simple cross shapes.
Step 4:
Assemble the Artwork
- Glue the large base along one side of the painted paper.
- Arrange the three cross shapes so they appear to sit on the base.
- Glue everything in place.
Step 5:
Finish
Look over the artwork and press down all edges. Add name and date (be sure to keep away from the edges)
Age Group
Grades K-5
Art Concepts 🎨
- Silhouette
- Warm vs. cool colors
- Color blending
- Symmetry
- Shape and contrast
- Collage composition
Time
45–60 minutes
-Day 1: Paint background (20–30 minutes)
-Day 2: Cut and glue silhouette (20–30 minutes)
Materials
- 8 1/2″ x 11″ white art paper
- Liquid watercolors or watercolor paints
- Large paintbrushes
- Water cups
- Paper towels
- Black construction paper
- Scissors
- Glue sticks
- Example of the project